Showing posts with label 1930s house. Show all posts

Sunday, 24 April 2016

The 1930s House: Living Room Renovation Complete!

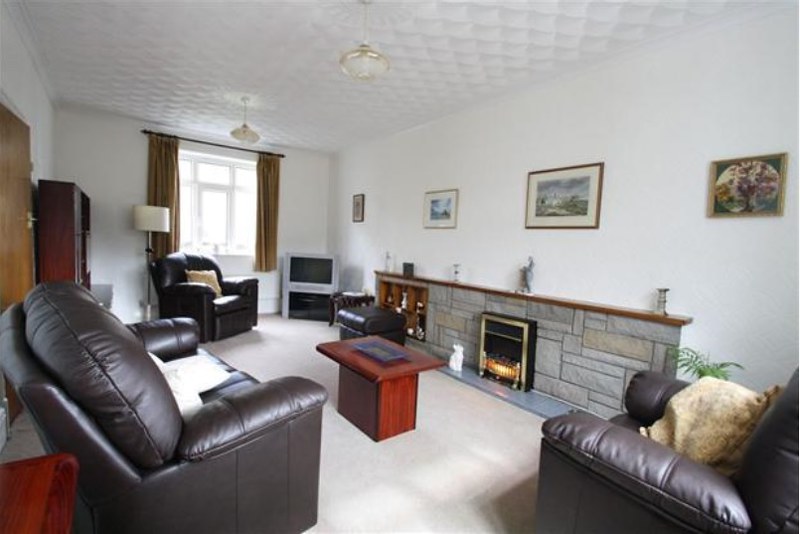
Today I can finally reveal pictures of our completed lounge renovation, after two years of on-off work.  Despite our house being built in the 1930s, our lounge had a distinct '70s feel when we moved in.  It was quite a challenge to transform the biggest room in the house into something cosy, inviting and more in keeping with the age of the house.  We didn't go for a 1930s' period look, but we did incorporate some Deco touches.  The majority of work was done solely by my husband, who bravely took on challenges such as laying parquet flooring.  Read on to find out what we did, and how much it cost.

Before...
The room was very white and plain, with a beige carpet that was sun-bleached in parts.  Textured walls, a feature stone wall with built-in mirrored knick-knack shelf and an electric fire all made it feel very outdated, and not in a good vintagey way.  The room had been extended in the '70s, so an additional problem was that the lovely original parquet flooring stopped two-thirds of the way along the room, with the new section having a particularly horrid lino flooring. 

Before renovation
Above and below: How the living room looked when we viewed the house

Wednesday, 9 March 2016

More 1930s' House Original Features

Although this blog seems to be mainly me posing, or showing you all the great finds from the car boot sale, it seems my most popular post of all time is about 1930s' house features.  People just like houses apparently.  So, for your viewing pleasure, here are a few more features from our 1935 house.  I am not showing you everything, because we've been doing a lot of DIY and I intend to do a big reveal at some point, so this is just to whet your appetites.

Interior
Windows often had pelmets, and we're lucky to have the original one in our bedroom.  Alas, the dining room has had its removed (sob sob!).  The bedroom one is not a particularly fancy one, but it does look so much better than a normal curtain rail.

1930s original features

1930s original features

Sunday, 23 November 2014

Wonky Walls & An AWOL Workman

Today, we're supposed to be having our lounge plastered.  I say 'supposed to' because our plasterer is currently driving around the neighbourhood to suspected haunts, searching for his labourer, who is not answering his phone.  This wouldn't have anything to do with the Wales v All Blacks rugby match that was on last night, would it?  Hmm...

So here's how far we've got with the lounge.  That lovely thick '60s style wallpaper is now stripped off (it had to go, sorry to those of you that liked it!!).  The uneven concrete in the fireplace has been chipped out, and we've laid new cement there to give a nice even surface for when we put down a new hearth.  The room has been prepped for plastering, with holes filled, and the shape of the fireplace opening properly revealed (I like the slightly curved top, I hope we can keep it).

Living room makeover

Thursday, 6 November 2014

The Revelation of the 1930's Parquet Flooring

It was another weekend of steaming ahead with the DIY.  And look what we have revealed in the lounge - a lovely bit of parquet!

parquet ta da

We knew that there was some parquet under there, but weren't sure of its condition.  It's pretty good!  It's a different colour around the edges, and splattered with paint, so will need sanding back with wire wool, reglazing and waxing.  But it should come up lovely with a bit of care!

Tuesday, 21 October 2014

Martinis to Celebrate the Dismantling of the 70's FIreplace

I had been looking forward to our next DIY project, erasing yet another '70s touch from our house by dismantling this feature wall, with built in mirrored knick-knack shelf.  It was with great relish and gusto that we got out the sledge hammer, chisels, and steel toe-capped boots.

Before...

Fireplace dismantling

Sunday, 10 August 2014

Example 1930's Interior

Hello there, and first up an apology for the 'radio silence' of late.  I have been rather busy at work and then was lucky enough to go off to Cornwall for a week!  The weather was smashing, and we were quite disconnected from technology with patchy wi-fi and phone connections.  I have an absolute tonne of catching up to do now, but hope to respond to comments, visit your own lovely blogs, and generally re-establish myself in the blogosphere over the next week.  I can't wait to hear what you've all been up to as well.

Following on from my zoo outfit, I thought I'd share some more photos from the Black Country Living Museum the other weekend, where we wandered into an apartment that they've decorated entirely in keeping with the 1930s.  I was really impressed with their attention to detail and wanted to share my photos with you all!  The apartment, whilst decorated in a 1930's style, is housed in a Victorian terrace, and so you will see some details - one of the fire surrounds in the bedroom for example - that reflect that earlier era.

The Lounge
1930s Interior

Monday, 4 August 2014

The 1930s House: Interiors on a Budget

What's been happening in the 1930's house then?  Well, a few small things since the installation of the art-deco inspired shelving and the dining table refurbishment.  I think I mentioned before that this is going to be a slowburner of a house and garden makeover, as we have a teeny-tiny budget and limited time outside of our respective work to fit it all in.

1930s home and garden

Friday, 30 May 2014

Vintage Gardening Guides

In my bid to find out what would have been planted originally in the garden of my 1935 house, I've come across some super vintage gardening guides.  Alas, none yet from the actual 1930s!

These first ones are from a series printed in the 1950s, 'Mr Cuthbert's', and I love his personal introduction.  I wonder if I can get hold of the rest of the series?  These are ones kept by my mother.

Vintage Gardening Guides

Monday, 20 January 2014

Table Restoration: Changing Wood Colour

You'll have to excuse another post about our 1930's house and our attempts at furniture!  It's so expensive to buy brand new of any quality, so therefore much of our time is spent drawing out plans, looking at antique furniture in charity shops and car boot sales, and talking about what type of wax polish would give the best finish!  We are completely obsessed, and it doesn't help that we're both perfectionists, ditherers and that there's not much left in the budget.

If you too have a dislike for modern, mass-produced, plastic coated furniture, this might interest you.

When we bought our dining room table, we loved the shape (the curves echo our bay window) and the size, but we didn't like the colour.  It was a sort of 1970's teak colour, which wouldn't have suited our dining room.  Then we happened to buy a set of 6 chairs, which were a sort of mahogany or rosewood, and we knew we just had to try and get them to match.


How do you get a teak table to match mahogany chairs?!

Here's how...

Firstly, you can't have sky high expectations.  We spoke to some professional furniture restorers whilst researching techniques, and even they can't guarantee a 100% colour match.  But you can get it in the same general tone, and match how light or dark it is.

Secondly, the better quality products you use, the better the finish will be.  We used products from Fiddes, which are excellent quality, and though pricey, a little goes a long way.  Their experts in store are very knowledgeable and helpful.

Step 1: Sanding back the surface
A finished piece of furniture can have many layers of wax, varnish, sealant, polish and such like on its surface, and these all need to be stripped off so that you can apply new layers.  For a large piece of furniture you will need to use some power tools, such as a rotary sander attached to a drill, or a belt sander.  Be very careful - a lot of furniture that looks like solid wood, is actually a 'veneer', where a thin layer of proper wood is simply glued onto a base made of MDF or chipboard, or something else cheap and unattractive looking.  The picture below shows the table with the two end sections sanded, and the middle yet to be done (so it's the orginal orangey colour).


Step 2: Prepare your surface
The freshly sanded surface will have lots of tiny 'bits' attached to it.  You'll need to wipe down the entire table by hand with a damp cloth.

Step 3: Stain your wood
The choice of stain doesn't have to be exact, think of it as a 'foundation', or a colour wash that an artist would apply to a canvas first before adding other colours.  It's a base coat.  We used Fiddes Wood Dye in 'Walnut', which is applied with a cloth.  After we'd stained our table, it was terrifyingly dark.  We hadn't yet bought any wax or other finishing products, and I'm glad, because we were able to look at the dark colour and decide then 'it's not got enough brown or red in it', and then we could go out and buy a wax with brown and red in it for step 5.

Step 4: Glaze your wood
We used Fiddes Clear Glaze, which was brushed on, and the excess wiped off with a cloth so that no brush marks remained.  This step adds extra durability to surfaces that are subject to wear and tear, like floors, tables etc.  We chose a satin finish, but it's available also in gloss and matt.

Step 5: Wax your wood
A fine wire wool is used to work the wax into the table, and you then buff the surface with a cloth afterwards.  We used Fiddes Supreme Wax in 'Cherry'.  The wax can be built up in layers, so if you have a piece of furniture with a few chips and scratches, the wax can help fill them and give a better finish.  There's also a colourless 'mellow' wax available if you don't want to add any additional colour to your wood.


As you can see, this kind of thing takes a lot of man hours, but it really does give a lovely new lease of life to something that was a perfectly good piece of furniture, but didn't quite fit the 'colour scheme'.


So, in total, here's what we spent:
Dining table = £10
Set of 6 chairs = £40
Fiddes wood stain =£13.01
Fiddes glaze = £15.39
Fiddes wax polish = £7.85

We have used tiny amounts of the dye, glaze and polish - they will go on to restore many more items of furniture.  So let's generously overestimate that we've used a fifth of all these products, that's only £7.25 to refinish a lovely table!  Total cost about £57.25 for the table and chairs we wanted.

I'll leave you with some pictures on the finished result, we're really pleased with it!  The top photo shows the table extended, you'll notice that the middle section is ever so slightly darker - this is because that section was initially darker when we started out, there will always be little quirks like that.

Can you spot the odd-one-out chair?


Have any of you attempted to upcycle any furniture?

Monday, 6 January 2014

1930s House Original Features

Happy New Year everyone, I hope this year is kind to you all.  I'm long overdue in sharing some pictures of some of the original features left in my 1935 house.  We're lucky to have these features preserved, as in the 1970s a lot of work was done to the house in the form of an extension, an avocado toilet suite, feature wall with knick-knack shelves and lots of artexing.  I'll save photos of those delights for later, when I can show 'before' and 'after' our rennovations.

To anyone interested in 1930s homes in the UK, I can't recommend The 1930s House Manual by Ian Rock enough.  It was invaluable when we were looking at our property, as it helped us understand a few things that our surveyor's report said, and helped allay some of our fears about old features and their potential dangers.  It also helped us to visualise some of the things we will be trying to achieve as we 'undo' some of the 1970s work and take it back to a more traditional and authentic finish.

First of all, our entrance hall.  Apparently in the 1930s, large entrance halls were popular as it helped you impress visitors - an idea of how social standing was important to people at the time.  The stair panelling is original, and in the book I read that - and saw visual evidence of - quite outlandish colour schemes in greens, reds and yellows.  I wonder if ours was ever bright and clashing, or if our previous owners just kept it neutral?  Our hallway is currently carpeted, but the original parquet is preserved underneath.

1930s house original features

The original parquet flooring is also in the dining room, and is under the carpet in our living room.  The blocks are in a herringbone pattern, approx 3" by 8", and apparently oak was commonly used at the time our house was built.  We can't be sure what wood it is - my other half thinks it might be pine, but that's quite a soft wood so I'm not convinced that it would have been used for the flooring.  Interjection by other half leaning over my laptop - I've just been told that 'pitched pine' is hard-wearing and used a lot as flooring, so there's my theory out the window!!


As well as the parquet, our dining room has a beautiful bay window.  Curves were very popular in the 1930s, especially with the Art Deco aesthetic, and a bay window really does introduce a lot of light into a room and open it up.

 
Stained glass portholes are another common feature of 1930s homes.  On the inside, ours is in the under-stairs cupboard, a shame really to have the feature tucked away!  But at night, with the light on in the cupboard, the glass looks beautiful as you approach our doorway.  The glass is leaded, and with age, the whole panel can start to bow slightly.


The lovely black and white tiled floor of our under-stairs cupboard.  Excuse the mess!


Upstairs in one of the bedrooms, the original 1930s linen cupboards are present.  Today, the boiler is in one half, but we still have the rest of the space to fill up with towels and sheets.


Two of our bedrooms have the orginal panelled ceilings.  The book was very helpful in explaining that the panels would be made of fibreboard, which was good to know because our surveyor wasn't 100% sure what they were made of, and if they'd been made later could have contained harmful asbestos.  Knowing that they were the original panels, we could identify that they were perfectly safe.  (I have to say, our estate agent mentioned that we'd probably 'want to change those', but then she thought the house was from the 1960s!).


Finally, upstairs all of the original doors, and possibly the original handles, are all present and correct.  The doors have 'rising butt' hinges, which means that as the door swings open, the whole door rises slightly in order for the door to smoothly rise over the carpet.  Downstairs, 4 of the original doors have been replaced with 1970's ones, the ones with a veneer over a hollow centre filled with what looks like corrugated cardboard.  They are on the list for replacing.


There are some more features that are hidden away a little - I have peeked behind our electric fire in the lounge to see a glimpse of some original 1930's tiles, but most are cracked or missing.

I wonder what else we will discover as we embark on our DIY projects?  If you are interested in seeing more 1930's interiors, you might like this post that features authentic 1930's decoration and furnishings at a museum.

What is your favourite feature of a 1930's house?  Do you like the style??

Wednesday, 11 December 2013

Art Deco Inspired Shelving

First of all, welcome new followers!  Today is a bit of a tangent and is about vintage inspired interiors.  My Baby has a vast collection of CDs, and myself a library's worth of books and DVDs.  The living room in our new home is rather large, so we decided that we needed an actual library to house our respective collections.  "I'll build some custom shelving", my Baby said.  "Can I have Art Deco shelving, please?" I requested, thinking that as we're in a 1930's house we should try and do something that would fit with the style.  My wish is his command.  Two weeks (of blood, sweat and tears) later...

art deco inspired shelving


I was thinking of buildings like this when we were sketching out ideas (images just from a Google image search of 'art deco building').  I knew I wanted some curves, and a stepped detail.  I think we've captured the 'essence' pretty well, considering they're shelves not apartments!

The project is halfway through - we still have to do a mirror set of shelves for the other wall, for the books and DVDs.  I think that will have to wait until January though, as I think my Baby needs a rest.

If you're interested in the construction details, then read on!
The shelves are in two sections (rather than making one huge L-shaped unit).  The shelves are made of planed pine (6" x 1") and the 15 horizontals are fitted into the 3 vertical supports on each unit with half-lap joints.  The joints were cut with a jigsaw, chiselled out, and then filed.  The ends of the horizontals were cut into quarter circle arcs using a jigsaw.  Sharp edges were all filed to soften them, and although the shelves stand on the floor, they have been secured to the wall with mirror plates to prevent them from toppling over.  A decorative stepped top lintel has been glued to each top of the shelving units.  The wood was all painted before assembly (with Sanctuary matt emulsion in 'Soothing') and lightly sanded.  The wood cost approximately £140, and we already had all other materials and tools needed.


What do you all think?  Do you like them??

Wednesday, 9 October 2013

Home Sweet Home: The 1930s House


FINALLY, my Baby and I are homeowners, and I think we've done pretty well with a fabulous house that was built in 1935.  Squeeeeeeeeeeeeeeee!!

It's a beautiful, beautiful home - and as we get through the list of DIY jobs I'll share some before and after pictures of rooms.  Our bedroom isn't looking too shabby seeing as we've only been in a week, and you can't make out the woodchip on the back wall in this pic!


We are feeling incredibly lucky, there are some wonderful original features to behold around the house, including a nice bit of parquet and a porthole stained-glass window.  I'll get around to photographing them soon, once I've finished with all of the boxes still piled up in the dining room!
 
As soon as I've unpacked a 1930's dress I'll be pretending I'm in an episode of Poirot.  It's going to be fun, fun, fun!!!

Now, is it a step too far to purchase a 1930's sideboard?  Hmm...
Related Posts Plugin for WordPress, Blogger...