Showing posts with label home. Show all posts

Sunday, 24 April 2016

The 1930s House: Living Room Renovation Complete!

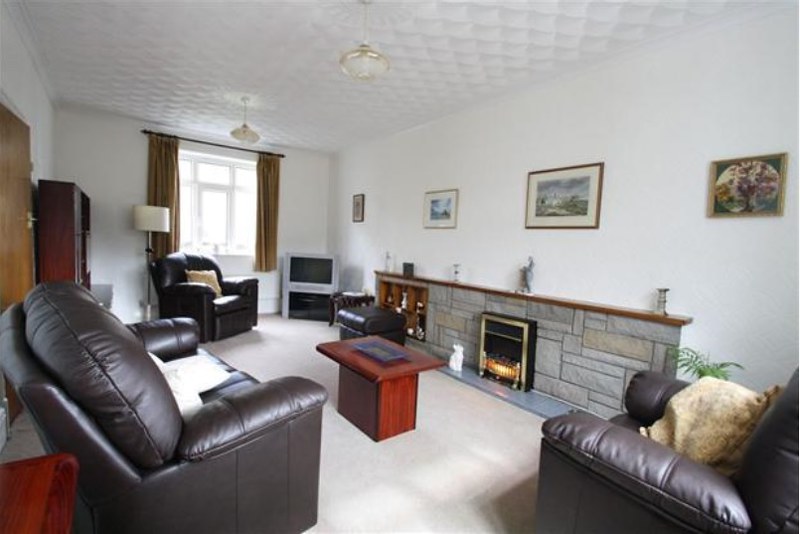
Today I can finally reveal pictures of our completed lounge renovation, after two years of on-off work.  Despite our house being built in the 1930s, our lounge had a distinct '70s feel when we moved in.  It was quite a challenge to transform the biggest room in the house into something cosy, inviting and more in keeping with the age of the house.  We didn't go for a 1930s' period look, but we did incorporate some Deco touches.  The majority of work was done solely by my husband, who bravely took on challenges such as laying parquet flooring.  Read on to find out what we did, and how much it cost.

Before...
The room was very white and plain, with a beige carpet that was sun-bleached in parts.  Textured walls, a feature stone wall with built-in mirrored knick-knack shelf and an electric fire all made it feel very outdated, and not in a good vintagey way.  The room had been extended in the '70s, so an additional problem was that the lovely original parquet flooring stopped two-thirds of the way along the room, with the new section having a particularly horrid lino flooring. 

Before renovation
Above and below: How the living room looked when we viewed the house

Wednesday, 9 March 2016

More 1930s' House Original Features

Although this blog seems to be mainly me posing, or showing you all the great finds from the car boot sale, it seems my most popular post of all time is about 1930s' house features.  People just like houses apparently.  So, for your viewing pleasure, here are a few more features from our 1935 house.  I am not showing you everything, because we've been doing a lot of DIY and I intend to do a big reveal at some point, so this is just to whet your appetites.

Interior
Windows often had pelmets, and we're lucky to have the original one in our bedroom.  Alas, the dining room has had its removed (sob sob!).  The bedroom one is not a particularly fancy one, but it does look so much better than a normal curtain rail.

1930s original features

1930s original features

Tuesday, 8 December 2015

DIY Update

My post last week on vintage inspired Christmas decorations was a bit of wishful thinking, as we don't have any decorations up ourselves yet.  There's a bit of a DIY saga behind this.  Do you remember the great pre-Christmas DIY debacle of 2014?  No?  Let me remind you.  It was the day before Christmas last year, and our living room looked like this:

Christmas spirit

Thursday, 3 December 2015

Vintage Home Christmas Decor Inspiration

It’s time to deck the halls!  If you are looking for a vintage theme to your Christmas home decor, I have three ideas outlined below.  Do you love the over-board colour of the 1950s, with all things kitsch?  Do you prefer to bring nature indoors for something more muted?  Or do you revel in the rich nostalgia of a Victorian Christmas?  Whatever your tastes. there is something for everyone - and on every budget.  For every theme, the best inspiration is freely available on the internet, but don't forget to rummage in your family photo albums too.

1) 1950s Kitsch
A 1950s Christmas is all about colour and shine, and embracing the novelty and the fun.  My mother still has some decorations from when she was a child in the early 1950s and they’re beautiful glass baubles in bright colours – magenta pink, cyan blue, gold and ruby red.  Blue fell out favour for a while, but luckily it's now back with a vengeance, no longer confined to being part of an ‘icy’ theme where it’s teamed with white and silver.  Don’t be afraid to throw some blue in with the reds, golds and greens.  When in doubt, go for every colour, rather than limiting it to a few!  Trees themselves could be silver, artificial twigs, or a real tree sprayed with paint, and they were loaded with baubles and draped with tinsel, to make sure they were as shiny and flammable looking as possible.


Christmas

Tuesday, 7 July 2015

How To Care For Vintage Leather: Chambers Leather Products Review

Do you ever find beautiful vintage leather goods in the charity shops yet leave them there because you think the leather has deteriorated to the point of no return?  Whether it's handbags, shoes, jackets or a piece of vintage furniture, leather can crack and dry as it ages and gain a layer of unsightly dust and dirt.  Leather needs special products to both clean and put moisture back in - don't be tempted to use home remedies such as olive oil, as this can seep back out in patches, ruining your items for good!

The good people at Chambers are specialists in leather care, and were kind enough to send me a selection box of their products to test out.  Included in the kit was a leather cleaner, two types of nourishing balsam, and a leather waterproofer.  Here's how we got on.


Leather care

Sunday, 7 December 2014

Attic Treasure

I use the word 'treasure' in a tongue-in-cheek way, because on our recent foray into the attic, we didn't find any antique vases, stashes of gold or chests of jewels.

Attic Treasure

Sunday, 23 November 2014

Wonky Walls & An AWOL Workman

Today, we're supposed to be having our lounge plastered.  I say 'supposed to' because our plasterer is currently driving around the neighbourhood to suspected haunts, searching for his labourer, who is not answering his phone.  This wouldn't have anything to do with the Wales v All Blacks rugby match that was on last night, would it?  Hmm...

So here's how far we've got with the lounge.  That lovely thick '60s style wallpaper is now stripped off (it had to go, sorry to those of you that liked it!!).  The uneven concrete in the fireplace has been chipped out, and we've laid new cement there to give a nice even surface for when we put down a new hearth.  The room has been prepped for plastering, with holes filled, and the shape of the fireplace opening properly revealed (I like the slightly curved top, I hope we can keep it).

Living room makeover

Tuesday, 18 November 2014

Book Review: Fifties House

Fifties House by Catriona Gray is a wonderful glimpse into mid-century home design, with three main sections, focusing on rooms, houses, and decoration.  The book is a narrated collection of articles taken from 1950's issues of House & Garden magazine,with pages of full colour photographs and illustrations.

Fifties House

Thursday, 6 November 2014

The Revelation of the 1930's Parquet Flooring

It was another weekend of steaming ahead with the DIY.  And look what we have revealed in the lounge - a lovely bit of parquet!

parquet ta da

We knew that there was some parquet under there, but weren't sure of its condition.  It's pretty good!  It's a different colour around the edges, and splattered with paint, so will need sanding back with wire wool, reglazing and waxing.  But it should come up lovely with a bit of care!

Tuesday, 21 October 2014

Martinis to Celebrate the Dismantling of the 70's FIreplace

I had been looking forward to our next DIY project, erasing yet another '70s touch from our house by dismantling this feature wall, with built in mirrored knick-knack shelf.  It was with great relish and gusto that we got out the sledge hammer, chisels, and steel toe-capped boots.

Before...

Fireplace dismantling

Sunday, 10 August 2014

Example 1930's Interior

Hello there, and first up an apology for the 'radio silence' of late.  I have been rather busy at work and then was lucky enough to go off to Cornwall for a week!  The weather was smashing, and we were quite disconnected from technology with patchy wi-fi and phone connections.  I have an absolute tonne of catching up to do now, but hope to respond to comments, visit your own lovely blogs, and generally re-establish myself in the blogosphere over the next week.  I can't wait to hear what you've all been up to as well.

Following on from my zoo outfit, I thought I'd share some more photos from the Black Country Living Museum the other weekend, where we wandered into an apartment that they've decorated entirely in keeping with the 1930s.  I was really impressed with their attention to detail and wanted to share my photos with you all!  The apartment, whilst decorated in a 1930's style, is housed in a Victorian terrace, and so you will see some details - one of the fire surrounds in the bedroom for example - that reflect that earlier era.

The Lounge
1930s Interior

Monday, 4 August 2014

The 1930s House: Interiors on a Budget

What's been happening in the 1930's house then?  Well, a few small things since the installation of the art-deco inspired shelving and the dining table refurbishment.  I think I mentioned before that this is going to be a slowburner of a house and garden makeover, as we have a teeny-tiny budget and limited time outside of our respective work to fit it all in.

1930s home and garden

Friday, 30 May 2014

Vintage Gardening Guides

In my bid to find out what would have been planted originally in the garden of my 1935 house, I've come across some super vintage gardening guides.  Alas, none yet from the actual 1930s!

These first ones are from a series printed in the 1950s, 'Mr Cuthbert's', and I love his personal introduction.  I wonder if I can get hold of the rest of the series?  These are ones kept by my mother.

Vintage Gardening Guides

Friday, 23 May 2014

Vintage Dressing Table Project

I've had a dream of sitting in front of a vintage dressing table, brushing my Veronica Lake like locks whilst wearing a peignoir.  Now, I may have to work on the hair and I don't own anything as fancy as a peignoir, but I now have the vintage dressing table!

In our local council run recycling centre, where to be honest we've sourced most things to furnish our house, I came across this little dressing table.  A little shabby looking, with a huge mirror, but it was just £10.  Perhaps some magic could restore this to something glorious?  I consulted my personal furniture restoration expert (the other half!) and he was enthusiastic that something could be done.  The mirror would need replacing, and I also found an art deco mirror in the same shop for £15.  It gets even better, because they did a deal for me, so I got the two items for £20!

The bedroom where the dressing table was to go already has some pine chest of drawers in, so I didn't want the new piece of furniture to dominate the room - a decision was made to paint it white.  I know it's a shame to paint wood sometimes (there's nothing like the feel of lovingly waxed and polished quality timber - see my previous post about the dining room table restoration we undertook last year) but it just wouldn't have worked in its new setting.

Vintage Dressing Table Project

Monday, 21 April 2014

Dig for Victory!

I do hope you've had a good Easter weekend?  I've been quiet, I know - that's because I've been spending all my time outside, preparing the garden for the months ahead!  It's been challenging at times, especially not knowing what all those plants are popping up everywhere in our new-to-us garden, and on more than one occasion I have dug up a 'weed' only to discover it's some rare and highly prized species of rose!!  It's a steep learning curve and I've never spent so much time on Google searching for things other than clothes.

Here are some pictures of the blooming loveliness that's been surrounding us.  I've spent most days in old jeans and a t-shirt, digging furiously.  We have planted a herb garden, an apple tree, bulbs for next Spring, and have begun work on the veg patch.  It's back-breaking work, but I am enjoying it immensely.  We've never been to bed so early, gosh it's exhausting.

Hurry up little seeds and grow! (old eggboxes make perfect seed trays!), and that's a cut glass dressing table tray underneath catching any water.

Monday, 10 March 2014

Glimpse Inside Historic Edwardian Mansion

We all love a nosey in others' homes, and for vintage-lovers, nothing beats looking at historic properties from bygone eras, especially when original features have been preserved.

In Cardiff, South Wales, a Grade-II listed historic mansion has gone on the market for the first time in 50 years, and so we can all get to see the pictures of the interior!  Formerly the home of Welsh philanthropist Sir Julian Hodge, the property was built in 1906 and has eight bedrooms.  The estate includes two buildings separate from the main house, and 5 acres of land.  If you'd like to guess how much this property is going for, have a look at the pictures, take a guess, and then you'll find the answer at the bottom of the page!

Edwardian mansion


What do you think of it?  I love the grounds, they're wonderful gardens - did you see the size of the glasshouse?  I also think the little lodge is very cute.  I am not sure about the interior of the main house though, the wood panelling they used back then is quite dark and I think you could probably spend a lot of money on this house giving it a bit of tlc whilst trying to retain the original character.  It's certainly not my dream house.

Price tag: £3 million!  On the market with Cooke and Arkwright here.

What do you think of the Edwardian style of property?  What's your favourite historic era for homes?

Monday, 20 January 2014

Table Restoration: Changing Wood Colour

You'll have to excuse another post about our 1930's house and our attempts at furniture!  It's so expensive to buy brand new of any quality, so therefore much of our time is spent drawing out plans, looking at antique furniture in charity shops and car boot sales, and talking about what type of wax polish would give the best finish!  We are completely obsessed, and it doesn't help that we're both perfectionists, ditherers and that there's not much left in the budget.

If you too have a dislike for modern, mass-produced, plastic coated furniture, this might interest you.

When we bought our dining room table, we loved the shape (the curves echo our bay window) and the size, but we didn't like the colour.  It was a sort of 1970's teak colour, which wouldn't have suited our dining room.  Then we happened to buy a set of 6 chairs, which were a sort of mahogany or rosewood, and we knew we just had to try and get them to match.


How do you get a teak table to match mahogany chairs?!

Here's how...

Firstly, you can't have sky high expectations.  We spoke to some professional furniture restorers whilst researching techniques, and even they can't guarantee a 100% colour match.  But you can get it in the same general tone, and match how light or dark it is.

Secondly, the better quality products you use, the better the finish will be.  We used products from Fiddes, which are excellent quality, and though pricey, a little goes a long way.  Their experts in store are very knowledgeable and helpful.

Step 1: Sanding back the surface
A finished piece of furniture can have many layers of wax, varnish, sealant, polish and such like on its surface, and these all need to be stripped off so that you can apply new layers.  For a large piece of furniture you will need to use some power tools, such as a rotary sander attached to a drill, or a belt sander.  Be very careful - a lot of furniture that looks like solid wood, is actually a 'veneer', where a thin layer of proper wood is simply glued onto a base made of MDF or chipboard, or something else cheap and unattractive looking.  The picture below shows the table with the two end sections sanded, and the middle yet to be done (so it's the orginal orangey colour).


Step 2: Prepare your surface
The freshly sanded surface will have lots of tiny 'bits' attached to it.  You'll need to wipe down the entire table by hand with a damp cloth.

Step 3: Stain your wood
The choice of stain doesn't have to be exact, think of it as a 'foundation', or a colour wash that an artist would apply to a canvas first before adding other colours.  It's a base coat.  We used Fiddes Wood Dye in 'Walnut', which is applied with a cloth.  After we'd stained our table, it was terrifyingly dark.  We hadn't yet bought any wax or other finishing products, and I'm glad, because we were able to look at the dark colour and decide then 'it's not got enough brown or red in it', and then we could go out and buy a wax with brown and red in it for step 5.

Step 4: Glaze your wood
We used Fiddes Clear Glaze, which was brushed on, and the excess wiped off with a cloth so that no brush marks remained.  This step adds extra durability to surfaces that are subject to wear and tear, like floors, tables etc.  We chose a satin finish, but it's available also in gloss and matt.

Step 5: Wax your wood
A fine wire wool is used to work the wax into the table, and you then buff the surface with a cloth afterwards.  We used Fiddes Supreme Wax in 'Cherry'.  The wax can be built up in layers, so if you have a piece of furniture with a few chips and scratches, the wax can help fill them and give a better finish.  There's also a colourless 'mellow' wax available if you don't want to add any additional colour to your wood.


As you can see, this kind of thing takes a lot of man hours, but it really does give a lovely new lease of life to something that was a perfectly good piece of furniture, but didn't quite fit the 'colour scheme'.


So, in total, here's what we spent:
Dining table = £10
Set of 6 chairs = £40
Fiddes wood stain =£13.01
Fiddes glaze = £15.39
Fiddes wax polish = £7.85

We have used tiny amounts of the dye, glaze and polish - they will go on to restore many more items of furniture.  So let's generously overestimate that we've used a fifth of all these products, that's only £7.25 to refinish a lovely table!  Total cost about £57.25 for the table and chairs we wanted.

I'll leave you with some pictures on the finished result, we're really pleased with it!  The top photo shows the table extended, you'll notice that the middle section is ever so slightly darker - this is because that section was initially darker when we started out, there will always be little quirks like that.

Can you spot the odd-one-out chair?


Have any of you attempted to upcycle any furniture?

Monday, 6 January 2014

1930s House Original Features

Happy New Year everyone, I hope this year is kind to you all.  I'm long overdue in sharing some pictures of some of the original features left in my 1935 house.  We're lucky to have these features preserved, as in the 1970s a lot of work was done to the house in the form of an extension, an avocado toilet suite, feature wall with knick-knack shelves and lots of artexing.  I'll save photos of those delights for later, when I can show 'before' and 'after' our rennovations.

To anyone interested in 1930s homes in the UK, I can't recommend The 1930s House Manual by Ian Rock enough.  It was invaluable when we were looking at our property, as it helped us understand a few things that our surveyor's report said, and helped allay some of our fears about old features and their potential dangers.  It also helped us to visualise some of the things we will be trying to achieve as we 'undo' some of the 1970s work and take it back to a more traditional and authentic finish.

First of all, our entrance hall.  Apparently in the 1930s, large entrance halls were popular as it helped you impress visitors - an idea of how social standing was important to people at the time.  The stair panelling is original, and in the book I read that - and saw visual evidence of - quite outlandish colour schemes in greens, reds and yellows.  I wonder if ours was ever bright and clashing, or if our previous owners just kept it neutral?  Our hallway is currently carpeted, but the original parquet is preserved underneath.

1930s house original features

The original parquet flooring is also in the dining room, and is under the carpet in our living room.  The blocks are in a herringbone pattern, approx 3" by 8", and apparently oak was commonly used at the time our house was built.  We can't be sure what wood it is - my other half thinks it might be pine, but that's quite a soft wood so I'm not convinced that it would have been used for the flooring.  Interjection by other half leaning over my laptop - I've just been told that 'pitched pine' is hard-wearing and used a lot as flooring, so there's my theory out the window!!


As well as the parquet, our dining room has a beautiful bay window.  Curves were very popular in the 1930s, especially with the Art Deco aesthetic, and a bay window really does introduce a lot of light into a room and open it up.

 
Stained glass portholes are another common feature of 1930s homes.  On the inside, ours is in the under-stairs cupboard, a shame really to have the feature tucked away!  But at night, with the light on in the cupboard, the glass looks beautiful as you approach our doorway.  The glass is leaded, and with age, the whole panel can start to bow slightly.


The lovely black and white tiled floor of our under-stairs cupboard.  Excuse the mess!


Upstairs in one of the bedrooms, the original 1930s linen cupboards are present.  Today, the boiler is in one half, but we still have the rest of the space to fill up with towels and sheets.


Two of our bedrooms have the orginal panelled ceilings.  The book was very helpful in explaining that the panels would be made of fibreboard, which was good to know because our surveyor wasn't 100% sure what they were made of, and if they'd been made later could have contained harmful asbestos.  Knowing that they were the original panels, we could identify that they were perfectly safe.  (I have to say, our estate agent mentioned that we'd probably 'want to change those', but then she thought the house was from the 1960s!).


Finally, upstairs all of the original doors, and possibly the original handles, are all present and correct.  The doors have 'rising butt' hinges, which means that as the door swings open, the whole door rises slightly in order for the door to smoothly rise over the carpet.  Downstairs, 4 of the original doors have been replaced with 1970's ones, the ones with a veneer over a hollow centre filled with what looks like corrugated cardboard.  They are on the list for replacing.


There are some more features that are hidden away a little - I have peeked behind our electric fire in the lounge to see a glimpse of some original 1930's tiles, but most are cracked or missing.

I wonder what else we will discover as we embark on our DIY projects?  If you are interested in seeing more 1930's interiors, you might like this post that features authentic 1930's decoration and furnishings at a museum.

What is your favourite feature of a 1930's house?  Do you like the style??

Sunday, 29 December 2013

Thrifty Christmas Decorating

Christmas is over!  Time to start thinking about how you'd like to decorate your home next year.  No, I'm not kidding!  The sales are the perfect time to grab some half price Christmas trees, decorations, giftwrap and cards, assuming you have somewhere to store them until next year.  And, now that you've got all your decorations up is the time to notice any areas that you think are under-decorated (e.g. you didn't have anything to put on your mantlepiece), and to make a note of things you definitely have enough of (e.g. if you have about 10 strings of fairy lights, that's probably enough...).  Make some lists in a little notebook and then throughout the year you can buy things as you see them, rather than do a last-minute panic.

Cards & Giftwrap
I've just been to Marks and Spencer and Next, and picked up some beautiful cards for £1.50 and £1 respectively for boxes of 20.  Their Christmas sales tend to be in-store only rather than online, so worth popping in if you're passing.  How many cards did you send this year?  I sent far more than I'd planned, once I took into account my workplace, so had a last-minute panic of buying more cards, which wasn't ideal.  I keep a spreadsheet (!) that tells me which cards I've sent to which people in what year, to avoid duplication.  Now that all my work colleagues are on the spreadsheet, I know more accurately how many cards I'll need for next year.

I also stocked up on gift wrap, £1.75 reduced from £4 a roll for 4 metre quality metallic wrap.  My top tip would be to buy plain metallic colours if you can, because then you can use them for birthdays, leaving presents, weddings, and pretty much every other occasion you can think of.  For example, a plain gold paper with some white ribbon looks quite 'weddingy', or use a plain red for a Valentine's gift and use some heart-print ribbon.  Ribbon is incidentally also half price in the sales, Next had some pretty patterns.

Trees and Ornaments
Being our first Christmas in our new home, we only had some tiny student size trees, and wanted to splash out on a big 7 foot one for our living room.  The one we chose was the artificial Meribel Sheen from B&Q for £45.  If you think that next year you'd like to upgrade then search the sales now - the one we bought is now just £22.50, with all of the B&Q trees being half price.  Sometimes you'll find them even cheaper, one year we saw trees orginally priced at over £100 for just £10.

I should confess that this year we actually had two trees!  On the Saturday before Christmas, B&Q slashed the price of all real trees to just £5.  It would have been rude not to!  So, we had a lovely real tree for our dining room.

With all this additional foliage, we were short of some baubles.  We'd managed to cobble enough together for the artificial tree, but did have to buy some additional baubles for the real tree.  Fortunately Morrisons had bumper packs of 55 assorted finish baubles at half price, for just £2.50, in either red or gold.  Great value, we're really pleased with them.  I also made a few decorations, I'll tell you more about that in another post.

Don't forget to look on Freecycle or car boot sales from January onwards for second-hand decorations - this year we passed up on a 6 foot artificial tree and a bin bag full of decorations for £5 at a local car boot sale, and I've seen so many Christmas trees going for cheap or free online.  People tend to buy new ones, even if they have a perfectly good old one, so take advantage of it.


The Christmas Table
I already had a tablecloth and lots of candles and candlesticks, so the table didn't need much dressing.  For the napkins, I had a rummage in my sewing box and found some black and red tartan fabric that matched the red of the tablecloth and black of the placements.  I tied this around each napkin and added a sprig of fresh rosemary, and a gift tag with name written on, to double up as a placecard setting.


Dressing the napkins in this way is a really quick and cheap way to smarten up the table a bit.  If you have a basic, plain set of placemats and other table items, then you can use them all year round, and add some 'festive' touches as required around Christmas.  Perfect if you don't have the space to store an entire lot of Christmas-themed table settings.

If you were short of plates, serving bowls and serving spoons, or a big platter this year, then start keeping a look out for these items in the sales.  These are also the kind of things you find for next to nothing at the car boot sale or in charity shops.  I bought two large silver-plated serving spoons just before Christmas at the local car boot sale for 50p, and a beautiful old cake knife also for 50p.  I'd already noted that I was missing these items, and just remembered to keep looking for them.  Seek and ye shall find!

Lighting
Was your tree twinkly enough this year?  We have 3 sets of lights on our large tree but to be honest it could take more.  As soon as car boot sale season starts, keep an eye out for strings of fairy lights.  We must have at least a dozen sets of lights now, some of them outdoor lights.  None of them were more than £3, and they were collected over a whole year of charity shop rummaging and car boot sale lurking!

If you do have spare lights that don't need to go on the tree, consider using them elsewhere.  A glass vase or bowl filled with lights looks enchanting, as does hanging them over mantlepieces, above windows and along bookshelves.  Don't have any spare fairy lights?  Consider adding extra lamps to a room, but with low wattage bulbs, so that light is softer and more diffused - you'll be amazed at the difference in atmosphere it makes.  You can always use candelight too if you candles or tealights already, but it does require the utmost care if where they are placed (keep away from Christmas cards and decorations!), and you can't leave them unattended.  You can get battery operated tealights, but I don't know how good they are.


The Scent of Christmas
Next to lighting, smell is one of the quickest ways to evoke atmosphere.  I'm a huge fan of the highly scented candles from Yankee Candle and The White Company.  Both do Christmas themed scents, and they really do fill a room with the most wonderful aromas.  They're pretty pricey, but this is again something you can look for in the sales - I got a 'Apple and Pine Needles' Yankee Candle last year for around half price.  I tried a huge, and cheap, scented candle from Home Bargains but alas the scent doesn't fill the room, you have to be up close to get any fragrance.  Sometimes it's worth spending the money on something that really works.   Alternatives are to use an oil burner with scented oils in, or you can let the smell of your mulled wine waft through the house as you're heating it.

Christmas Food & Presents
This isn't about decorating, but I should add look out for nice presents and food in the sales!  Stash them away in a box or a drawer for next year.  Food items that are always on sale after Christmas include Christmas puddings (on sale now they should have a best before Spring 2015), and even things like bottles of mulled wine.  I always keep an eye out for items in the sales that would make nice gifts - angora socks (below from Next, £4 reduced from £10), boxes of chocolates (check the date on them), scarves, hats, bags and such like.  I tuck them away and use them for birthdays coming up in the next couple of months.


Are any of you preparing for next Christmas already by stashing things away?  I hope I'm not the only one stocking up on cards and giftwrap already!


Related Posts Plugin for WordPress, Blogger...